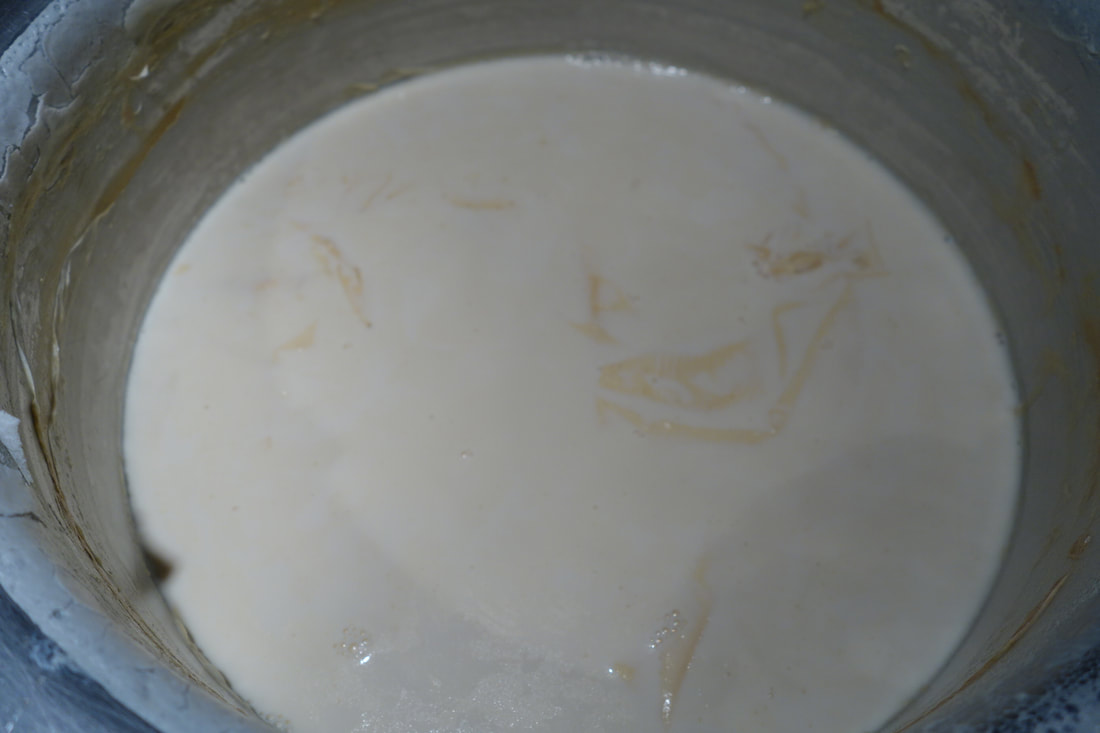
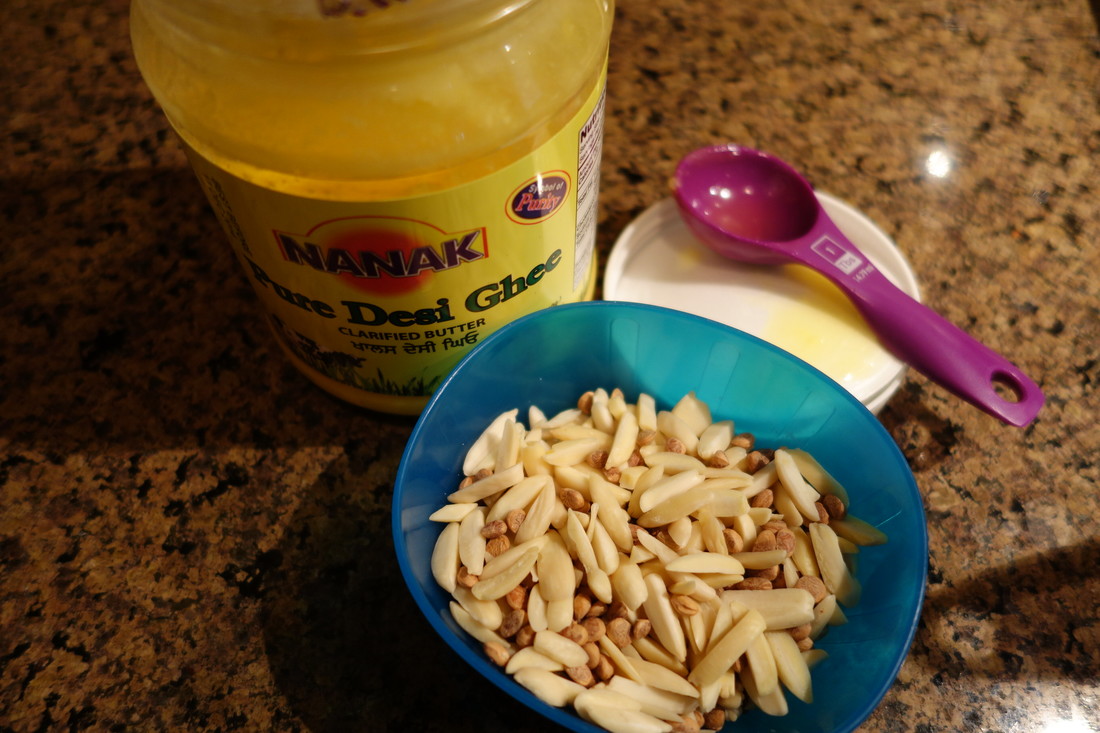
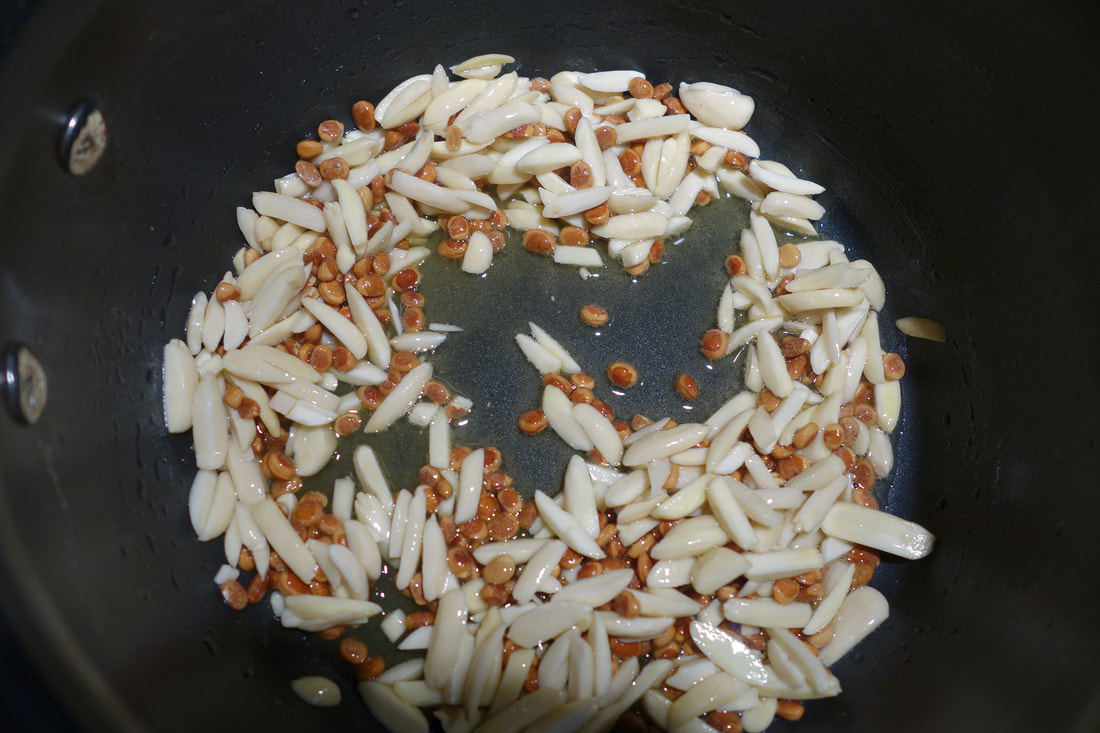
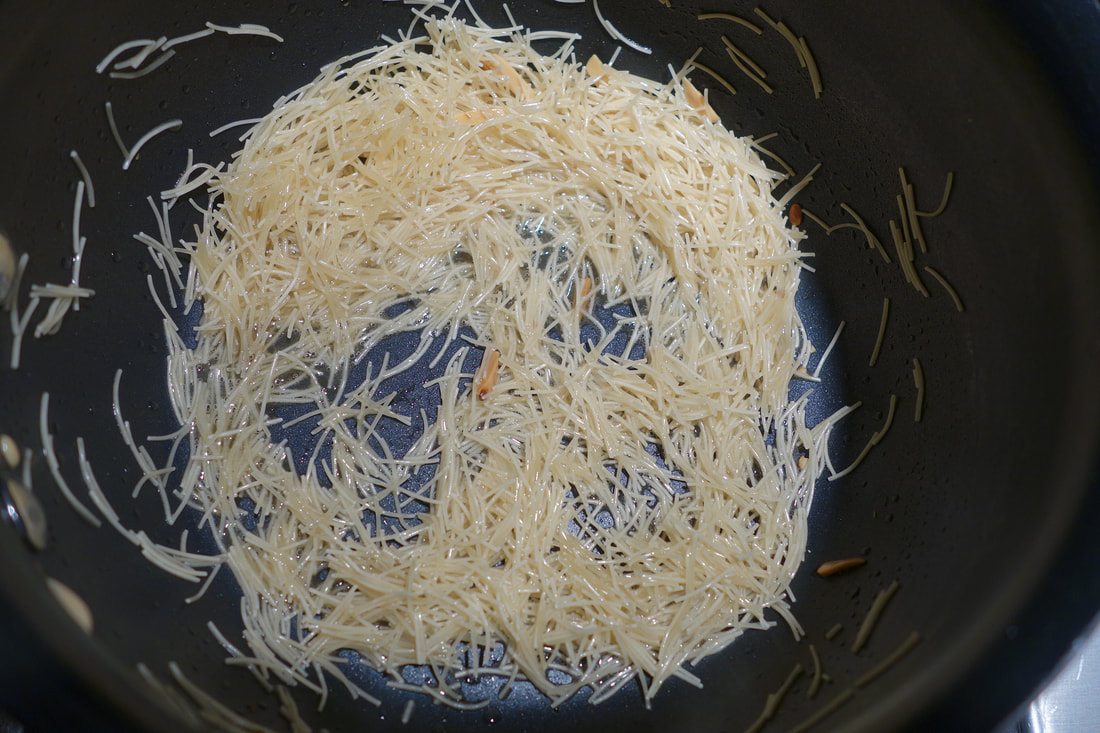
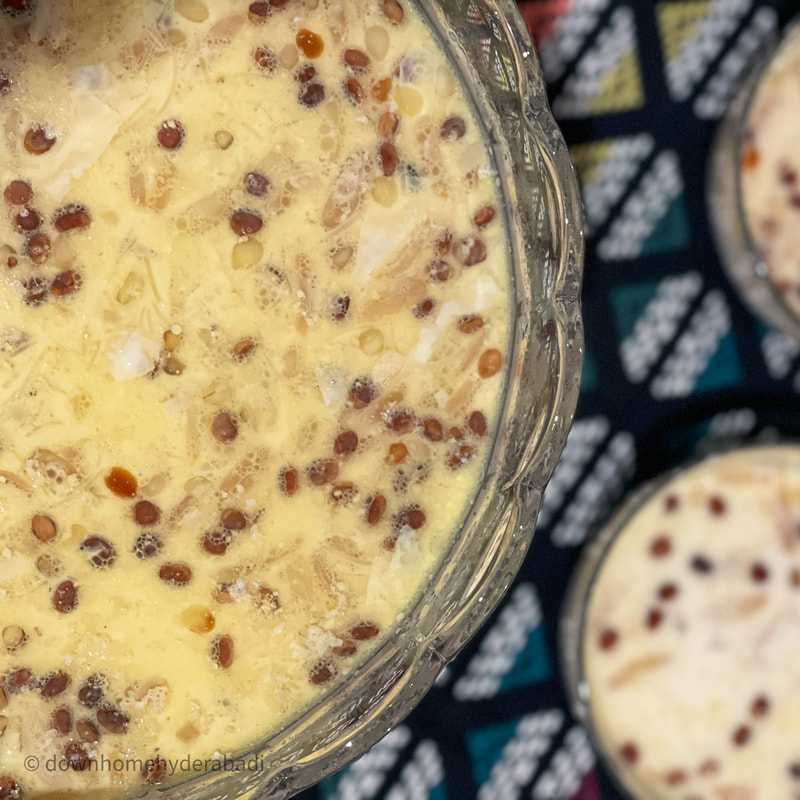
 It seems just like yesterday we returned from our family trip to India, but its going to be almost 4 years this summer since we decided to take the boys on their first trip to India. Despite my inhibitions about traveling with the boys, my husband and I(kind of) really wanted them to get a taste of Hyderabad during the month of Ramadan. I'm sure my parents took us during our childhood, but this would be my first trip to Hyderabad during Ramadan that I would remember as well. We made it to Ramadan during the last 10 days of Ramadan, which is the busiest and most exciting time of the month. The city is so lively and vibrant during this time. There are food stands everywhere and shops are open all night. The hustle and bustle of people up until the early hours of the morning is simply mesmerizing. Since it was the boys first trip, it was quite a culture shock for them. They were so excited though and soaked up the culture every minute of the day. Their favorite thing to do while we drove around town was to find billboards with their names on it, such as 'Zeeshan Cafe', 'Nadir Tailors', 'Zain Sweets', or 'Yusuf Dairy'! (I can't remember what Adil's name was used as!). They had a blast a they truly gave me an entirely new perspective of the city and culture. 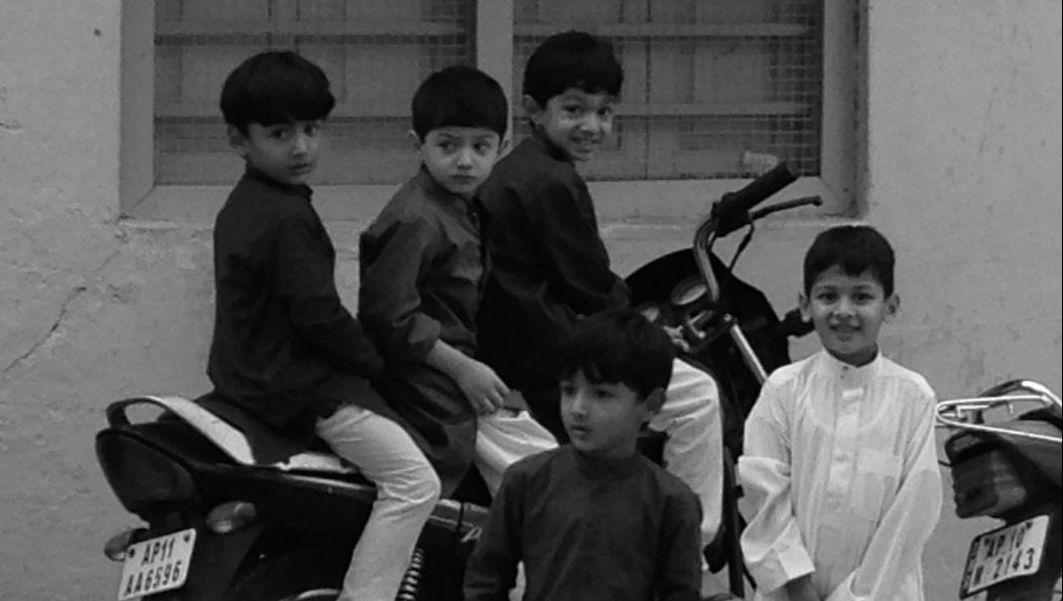 Like I said before, this was my very first Eid(that I remember) in Hyderabad. It was a lot of fun and very busy. It basically consisted of a constant influx of friends and family coming to wish everyone 'Eid Mubarak' and of course lots and lots of food! The traditional Eid breakfast served at our home is Nehari/Paya(Lamb Trotters Broth) served with a delicious naan from the local bakery. Of course Eid is not complete until you have the ever-popular Sheer Korma. Sheer Korma is the traditional Hyderabadi sweet dish consisting of sweetened milk with roasted vermicelli and mixture of various chopped nuts, also known as "maghziyat'. It is popularly served in most every Hyderabadi home on Eid, particularly Eid-ul-Fitr. It is served to everyone and anyone who comes to wish you on Eid and what you will most definitely be offered when you visit someone. I remember my father telling me when I was little that it would be his mission on Eid to go and have sheer korma at everyones home in their neighborhood when he was growing up. I finally got to experience this first-hand as all the little boys(mine included) were going around to the neighbors home to have their share of Sheer Korma. Needless to say, growing up, I did not have the option of going to my neighbors homes for a taste of Sheer Korma. My mom, however, definitely did not have a single Eid without this delicious dessert. She always, and still does, put the extra effort to make sure we had the most traditional Eid day experience by serving all the popular Hyderabadi dishes. I hope you all give this sweet dish a try, you will not be disappointed! Ingredients 3 qts whole milk 1 12 oz. can evaporated milk 1 14 oz. can condensed milk 2 cups fine Saveya/Vermicelli(Found at Indian Stores) 3 tbsp ghee 2 cups sugar 1 1/2 cups mixed nuts: any combination of the following: finely sliced almonds,finely sliced cashews, finely sliced pistachios, and Chironji (Charoli/Buchanania Ianzan Seeds-Found at Indian Stores) 10-12 Small Pitted Dates(optional) Method 1. Prepare the "maghziyat", or mixture of nuts. In a bowl, soak the almonds, cashews, and pistachios overnight. Once the nuts have softened, finely slice each nut and let dry on a towel. Mix together with the charoli nuts to complete the mixture(traditionally the charoli is also soaked and the skin is peeled off, but I like the color from the nut in my desserts. Alternate method: Ready made sliced nuts may be used to save time. 2. In a thick-bottomed and nonstick pot, add the milk and bring to a boil on medium-low heat. It is important to use a nonstick pot, or even a traditional Indian silver pot, to ensure the milk does does not burn and stick to the bottom. Keep a close eye one the pot to make sure the milk does not boil over. 3. Once the milk comes to boil, add the evaporated milk and condensed milk. Turn the heat down to low and continue softly boiling until the milk changes color to a light creamy hue. As it is cooking you will notice a thin layer of cream, malai, forming on the top. Do not remove this and keep mixing it into the milk. This cream, or malai, will add more richness to the dessert. 4. While the milk cooks, prepare the syrup with vermicelli and sugar in a separate pot. 5. Heat the ghee on medium heat and lightly fry the "maghziyat', or nuts mixture from step one. Remove the nuts from the ghee and keep aside. 6. Gently break up the vermicelli into 2-3 inch long pieces. Now add the vermicelli to the same ghee(you may need to replenish by adding 1 tbsp ghee). Lightly brown the vermicelli. 7. Next, add about 1 cup of the nuts mixture back to the vermicelli. Then add about 2 cups sugar(I have given an average amount for sugar, you may adjust to your liking by adding more or less) and mix together. Then add about 1/2 cup water to dissolve the sugar to form a nice thick syrup with the vermicelli. Bring to a slow boil, remove from heat and keep aside. 8. Now add the syrup to the boiled milk. Mix everything together and turn the heat up a little to let everything cook together for about 15-20. You will see the vermicelli slowly thicken up. Check sugar and adjust to your liking. Note: I like the consistency to be more milky, less vermicelli. If you want to have more noodles, add about 1/2-1 cup more vermicelli in step 6. Serving Directions: Sheer Korma is traditionally served warm. Top with the remaining nuts and add one or two dates. The dates add an extra level of flavor to the Sheer Korma, but is completely optional.
1 Comment
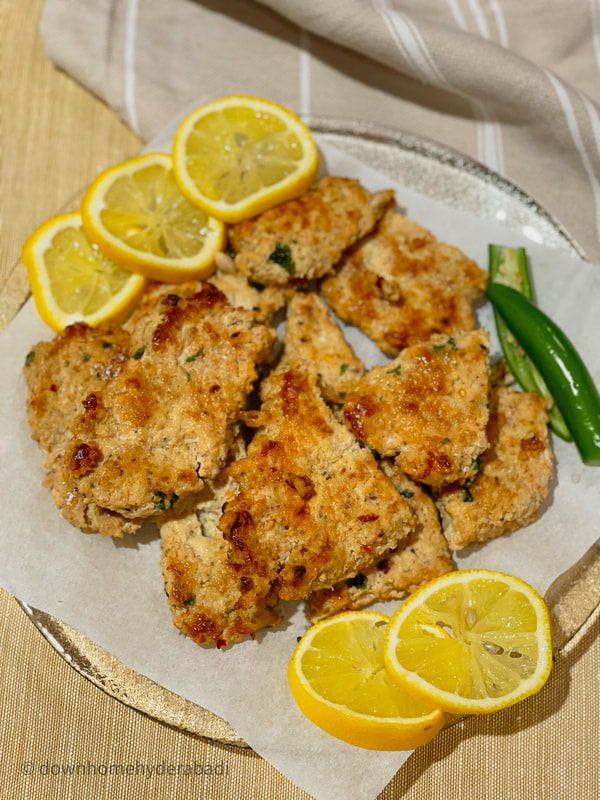 Hi everyone! I have a super versatile recipe up for you guys today. These pan-fried chicken kabobs are super easy to make and are the best for when you want to have kabobs, without the hassle of forming the patties. You can use them for chicken burgers, pita wraps, or as a side dish with rice! I originally posted this recipe as the traditional kabobs. The recipe is still good for you to use in that way. I just updated it to a version that I am using more and more in my everyday cooking. The recipe is great for Ramadan if you want to make them ahead of time and freeze. You can pop them out of the freezer for super quick weeknight mea and is very Air Fryer friendly. You can place the kabobs into the air fryer and within a few minutes have healthy and delicious kabobs! I have a few tips for make-ahead and air-fryer versions, so please make sure to check that out. I hope you enjoy and I would love to hear from you guys. If you test any of my recipes out, please let me know how your experience was. Have a great day! Ingredients 2 lb Ground Chicken 2 tsp Salt 1/4 tsp Garam Masala 1 tsp Cumin Powder 1 tsp Black Pepper 1 tbsp Crushed Red Powder 1 tbsp Ginger-Garlic Paste 1 tbsp Finely Chopped Green Chili Pepper(for extra spicy kabobs, omit for less heat) 2 tbsp Finely Chopped Cilantro 3 tbsp Vegetable Oil for Frying Method for the Pan-Style Kabobs
1. In a large bowl, mix all the ingredients together well and let sit for about 30 minutes. 2. Heat 3 tbsp oil in a frying pan. Slowly add about half the chicken mixture to the pan and spread using a spatula into a large ‘kabob’ covering the pan. 3. All to cook for a few minutes on one side and then cut into fourths using ur spatula. This will make it easier to flip the chicken. Flip onto the other side and cook until both sides are nicely browned and edges are a bit crispy. 4. Repeat with the second half of the chicken mixture. You may need to replenish the oil by adding 1 tbsp of oil. Method for Traditional Round Kabobs 1. In a large bowl, mix all the ingredients together well and let sit for about 30 minutes. 2. Form the chicken into round patties. Tip: I like to use an ice cream scoop to ensure all kabobs are the same size. Lightly oil the palm of your hand, take a scoop of ground chicken, and form into round patties. 3. Lightly oil a frying pan /grill pan and heat on medium heat. Carefully place each kabob onto the pan and let cook on each side for about 3-4 minutes, or until golden brown on both sides. Remove from pan and place on plate lined with paper towel to soak up excess oil. Chicken Kabobs are ready to serve as you please! Enjoy! Make-Ahead Tips: If you plan to make the kabobs to freeze for future use, you can store them two ways. 1. Cook for about 2-3 minutes on each side. Let it cool and freeze. When ready to eat, defrost the kabobs and grill on the pan for about 1-2 minutes until golden brown for juicy kabobs. 2. Freeze the raw chicken patties, defrost, and grill as stated in step 3 above. Air Fryer: Place a few kabobs in the air fryer at 350ºF for 10 minutes, stopping and turning over halfway. This is a great oil-free option! |